Ready to unlock the full potential of your Shopify store? In 2026, mastering advanced tracking is the game changer, and google tag manager in shopify puts you firmly in control.
This guide breaks down exactly how to implement, configure, and maximize GTM for your Shopify business. Whether you want precision analytics or seamless marketing integrations, we've got you covered with actionable steps and expert insights.
You'll discover the basics of GTM, learn installation tips, dive into advanced event tracking, and get ahead of privacy compliance and future analytics trends. Let’s empower your data-driven decisions with clear, practical guidance—your journey to smarter Shopify tracking starts here.
Understanding Google Tag Manager and Its Role in Shopify
Google Tag Manager (GTM) is a powerful tag management system that lets you deploy, update, and manage marketing and analytics tags on your website without editing code directly. Instead of hard-coding tracking snippets for tools like Google Analytics or Facebook Pixel, you use a central GTM dashboard to control all your tags. This approach not only saves time but also reduces the risk of errors when making changes or adding new tags.
With GTM, you can quickly adapt to new marketing needs without waiting for developers. For instance, adding a new conversion pixel or A/B testing script becomes as simple as a few clicks. This agility is crucial for fast-growing ecommerce brands. GTM also supports version control, making it easy to roll back changes if needed. For a step-by-step look at how this works in Shopify, check out Shopify's Google Tag Manager Guide, which walks you through the key setup steps.
| Feature | Direct Code Tracking | Google Tag Manager |
|---|---|---|
| Tag Management | Manual code edits | Centralized dashboard |
| Scalability | Complex as tags grow | Handles many tags easily |
| Error Reduction | Prone to mistakes | Version control, testing tools |

What is Google Tag Manager?
At its core, Google Tag Manager in Shopify acts as a bridge between your store and all your marketing and analytics tools. Instead of pasting different tracking codes across dozens of theme files, you add the GTM container code once. Then, you manage every tag, trigger, and variable through the GTM web interface.
This centralized control means you can launch new campaigns or update tracking pixels without touching Shopify theme code. Compared to direct code-based tracking, GTM offers cleaner management, reduces duplication, and simplifies troubleshooting. For example, if you want to add Google Analytics, Facebook Pixel, and TikTok tracking, you do it all from one place.
The benefits are clear: agility, reduced errors, and easy scalability. If you need to pause a tag for a special promotion or test a new marketing tool, GTM makes it seamless. This flexibility is especially valuable as your store grows and your marketing stack becomes more complex.
Why Use GTM in Shopify?
Shopify’s built-in analytics are a solid starting point, but many merchants quickly hit a wall when they need advanced tracking. Google Tag Manager in Shopify enables you to track multi-channel campaigns, custom conversion events, and granular user behavior that native Shopify tools cannot capture.
Native tracking works for simple sales reports, but for remarketing, funnel analysis, and advanced Google Ads conversion tracking, GTM is essential. Imagine you want to track every step in the checkout funnel or measure the impact of a specific ad campaign. GTM makes this possible by letting you fire tags based on custom events and dataLayer variables.
Industry data shows that over 60% of top ecommerce brands rely on GTM for detailed analytics and flexible marketing integrations. For example, a brand running Google Ads can use GTM to fire conversion tags only when a purchase is complete, boosting accuracy and optimizing ad spend. This level of control is vital for merchants who want to scale and compete at the highest level.
GTM vs. Shopify’s Native Pixel & App Integrations
When comparing Google Tag Manager in Shopify to native pixel and app integrations, the difference often comes down to flexibility and data granularity. Shopify’s built-in integrations are easy to set up, but they offer limited customization. For basic tracking, they work fine, but when you need to capture custom events or send enhanced eCommerce data, GTM is far superior.
Shopify’s Customer Events system and checkout tracking present unique challenges. Native events are sometimes delayed or incomplete, especially during checkout. In contrast, GTM allows you to implement custom purchase events, ensuring that every sale is tracked accurately, even on the thank you page.
Here’s a quick example: If you want to track a custom upsell or a specific button click, native Shopify events may not support it. With GTM, you can create a custom trigger and push detailed data to your analytics tools. This kind of precision can make a significant impact on your marketing ROI and business intelligence.
Step-by-Step: Installing Google Tag Manager in Shopify (2026 Edition)
Unlocking the full power of google tag manager in shopify starts with a precise installation process. Whether you’re upgrading analytics or streamlining marketing tags, following these steps ensures your store is ready for data-driven growth.

Preparing Your GTM Container and Shopify Store
Start by setting up a dedicated Google Tag Manager container for your Shopify store. Log into your GTM account and create a new container, naming it after your Shopify store for easy identification.
After creating the container, GTM provides two essential code snippets: one for the <head> and one for the <body>. Copy both snippets and keep them handy, as you’ll need them for the next steps.
Before making any changes, verify your Shopify theme's compatibility. Navigate to your Shopify admin, then Online Store, and select Themes. Confirm you have permission to edit the theme code. It’s best practice to create a backup of your theme before editing any files. Go to Actions, then Duplicate, to save a copy. This safety net allows you to restore your store if anything goes wrong during the installation of google tag manager in shopify.
Taking these preparatory steps reduces risk and sets a strong foundation for accurate tag management. With your GTM container ready and theme backed up, you’re prepared to integrate advanced tracking solutions.
Inserting GTM Snippets into Shopify Theme Files
Now, embed google tag manager in shopify by placing the GTM snippets correctly in your theme files. From your Shopify admin, navigate to Online Store, then Themes, and click Actions > Edit Code. Locate theme.liquid in the Layout directory.
Paste the first GTM snippet immediately after the opening <head> tag. This ensures all tags load promptly and function as intended. Next, find the opening <body> tag and insert the second GTM snippet directly after it. Placing these snippets in the correct spots is crucial. Many store owners mistakenly insert them too deep in the code, causing tags to misfire or not load at all.
Here’s a quick reference table:
| Snippet | File | Placement |
|---|---|---|
| GTM Head Snippet | theme.liquid | Just after <head> |
| GTM Body Snippet | theme.liquid | Directly after <body> |
Use screenshots from trusted sources like MeasureSchool to double-check your placements. This visual confirmation can prevent common errors and ensures your implementation of google tag manager in shopify is flawless.
Once done, save your changes and refresh your storefront to confirm the snippets are active. Double-check both desktop and mobile themes.
Adding GTM to Shopify’s Thank You Page
To track conversions and post-purchase events, you must extend google tag manager in shopify to the Thank You page. In your Shopify admin, go to Settings, then Checkout, and scroll to the Additional Scripts section.
Paste both GTM snippets here as well. This step is vital because, due to Shopify’s checkout restrictions, standard theme files do not always control the order confirmation page. For most Shopify plans, this is the only way to ensure GTM loads on the Thank You page.
If you’re on Shopify Plus, you have access to the checkout.liquid file, offering more flexibility. Edit this file to place the GTM snippets as you did in theme.liquid. This approach ensures advanced tracking, like Google Ads conversions, is captured accurately.
Recent changes to Shopify’s checkout architecture have made this step even more essential. For more on adapting to these updates, see Shopify's Checkout Overhaul and Google Tags Migration.
After saving, test a purchase to verify that tags fire on the confirmation page. Missing this step can result in lost conversion data.
Verifying Installation
With google tag manager in shopify installed, thorough verification is a must. Open GTM’s Preview mode and connect it to your live store. Browse several pages and complete a test checkout.
Check the GTM debug panel to confirm both pageview and event tags are firing as expected. Use tools like Google Tag Assistant or your browser’s developer console to inspect for errors or missing tags.
If you notice GTM not loading on checkout or Thank You pages, review the snippet placement. Common issues include pasting snippets in the wrong location or missing the Additional Scripts section entirely.
Refer to community forums if you encounter persistent problems. Often, the solution is as simple as correcting a misplaced snippet or clearing your site cache.
Regular verification keeps your google tag manager in shopify running smoothly and ensures your analytics remain accurate as your store evolves.
Configuring Tags, Triggers, and Variables for Shopify Events
Unlocking the true power of google tag manager in shopify starts with mastering tags, triggers, and variables. This configuration is the bedrock for accurate analytics and actionable insights. Each element—tag, trigger, or variable—plays a unique role in capturing and transmitting data from your Shopify store to your preferred analytics and marketing platforms.
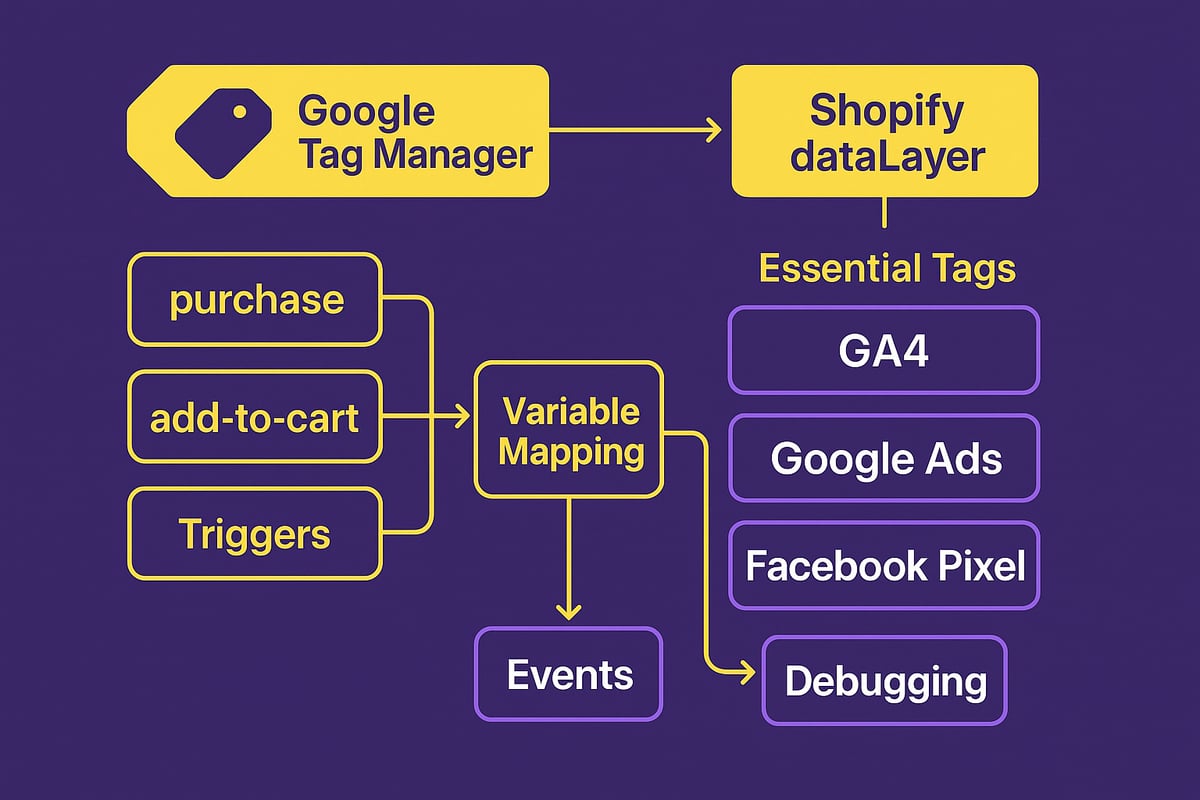
Setting Up Essential Tags (GA4, Google Ads, Facebook Pixel)
To get started with google tag manager in shopify, your first step is creating the right tags. Tags are snippets of code that send data to platforms like Google Analytics 4 (GA4), Google Ads, and Facebook Pixel.
Begin by navigating to your GTM dashboard. Click "Add a new tag" and select the GA4 Configuration tag. Enter your Measurement ID (found in your GA4 property) and set the trigger to "All Pages." This ensures every pageview on your Shopify store is tracked.
For Google Ads, create a new tag using the "Google Ads Conversion Tracking" template. Add your Conversion ID and Label, then set triggers for specific events, like purchases or add-to-cart actions. The same logic applies to the Facebook Pixel tag—choose the correct template, input your Pixel ID, and assign the right triggers.
Here's a quick table summarizing essential tags for google tag manager in shopify:
| Tag Type | Required Info | Trigger Example |
|---|---|---|
| GA4 Config | Measurement ID | All Pages |
| Google Ads | Conversion ID/Label | Purchase |
| Facebook Pixel | Pixel ID | Add-to-Cart |
Configuring these tags ensures you can measure conversions, user journeys, and marketing ROI with unmatched precision.
Creating Triggers for Shopify-Specific Events
Triggers tell google tag manager in shopify when to fire each tag. Shopify's ecosystem has unique events—like checkout, purchase, and add-to-cart—that you need to capture for advanced tracking.
For most Shopify stores, custom event triggers are required. For example, to track a completed purchase, set up a trigger for a Custom Event named purchase or checkout_completed. This trigger should listen for a dataLayer.push event on your thank you page.
Here’s a sample code snippet for a purchase event:
window.dataLayer = window.dataLayer || [];
window.dataLayer.push({
  event: 'purchase',
  transaction_id: '{{ order_number }}',
  value: '{{ total_price | money_without_currency }}',
  currency: '{{ currency }}'
});
Map this event in GTM by creating a trigger that listens for the purchase event. You can repeat this process for other Shopify events, such as add_to_cart or begin_checkout. This approach ensures google tag manager in shopify captures the full customer journey, not just pageviews.
By leveraging event-based triggers, you unlock powerful data streams for remarketing, funnel analysis, and conversion optimization.
Defining Variables for eCommerce Tracking
Variables allow google tag manager in shopify to capture granular event details, like order value or customer email. These variables pull information from Shopify’s dataLayer, making your tags highly dynamic.
Start by defining dataLayer variables in GTM. For example:
transaction_idfor order numbervaluefor purchase amountcurrencyfor transaction currencyemailandphonefor customer contact
To set up these variables, go to Variables in GTM, click "New," and choose Data Layer Variable. Enter the exact key name, such as transaction_id.
A well-structured dataLayer is critical for reliable tracking. For a complete breakdown of organizing Shopify data for GTM, see Everything on a prospect card, which details best practices for data management and variable mapping.
With variables in place, google tag manager in shopify can send rich, actionable data to analytics and ad platforms, supporting everything from order attribution to customer segmentation.
Testing and Debugging Your Tag Setup
Testing is vital to ensure your google tag manager in shopify configuration works flawlessly. GTM’s Preview mode allows you to simulate user journeys and verify tag firing in real time.
After setting up tags and triggers, click "Preview" in GTM. Visit your Shopify store, perform test actions (like placing a test order), and watch the debug console to confirm tags fire as intended. Check that variables like transaction_id and value are populated correctly.
For further troubleshooting:
- Use browser tools like Google Tag Assistant.
- Inspect the dataLayer in your browser console.
- Double-check trigger conditions and variable names.
- Review Shopify’s thank you page for script placement issues.
Consistent testing ensures your google tag manager in shopify setup delivers accurate, actionable insights, supporting smarter marketing and business decisions.
Advanced GTM Strategies for Shopify Stores
Unlocking the full power of google tag manager in shopify means moving beyond basic analytics. Advanced GTM strategies help you track richer data, automate marketing, and future-proof your analytics setup. Whether you want to capture every customer touchpoint or personalize experiences, mastering these techniques gives your Shopify store a serious competitive edge.
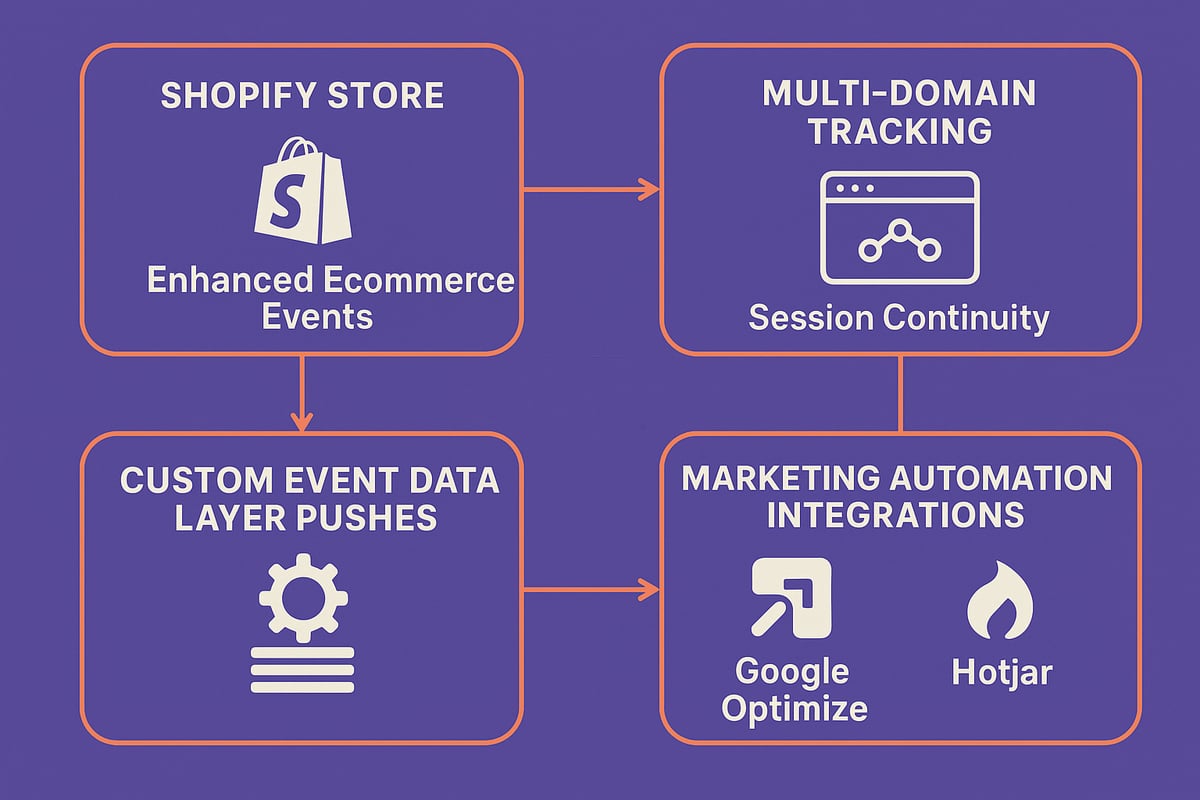
Enhanced eCommerce Tracking with GTM
To maximize google tag manager in shopify, enable enhanced eCommerce tracking. This lets you capture granular actions like product impressions, add-to-cart events, and each step of the checkout process. By pushing structured data to the dataLayer, you can send rich event information to Google Analytics 4 (GA4) and other platforms.
Common enhanced eCommerce events to track:
- Product impressions (when a product is viewed)
- Add-to-cart actions
- Checkout initiation and each checkout step
- Purchases and refunds
GA4’s Enhanced Measurement also helps you automatically track scrolls, outbound clicks, and site search—no extra code needed. During GA4 setup, just enable Enhanced Measurement to cover these basics. For custom needs, use GTM to fire tags on specific dataLayer events, ensuring every important interaction is logged.
Custom Event Tracking and DataLayer Management
For true flexibility, google tag manager in shopify lets you capture custom events that go beyond standard eCommerce. Want to track newsletter signups, video plays, or successful upsells? Push custom event data into the dataLayer and build GTM triggers to fire when these actions occur.
Example dataLayer push for a custom upsell event:
window.dataLayer = window.dataLayer || [];
window.dataLayer.push({
  event: 'upsell_completed',
  product_id: 'SKU123',
  value: 25.00,
  currency: 'USD'
});
Use GTM’s variable and trigger features to catch these events and send them to your analytics or ad platforms. This approach gives you full control over what gets tracked, making your analytics unique to your business goals.
Handling Multi-Domain and Cross-Device Tracking
Shopify stores often use multiple domains or subdomains, especially during checkout. Keeping user sessions intact across these domains is crucial for accurate analytics. With google tag manager in shopify, you can configure GA4 and other tags for seamless cross-domain tracking.
Steps to ensure session continuity:
- Set up GA4’s cross-domain measurement with the correct domains listed.
- Use GTM to deploy consistent tracking scripts across all store and checkout pages.
- Monitor session IDs to verify users aren’t split into separate sessions.
For advanced accuracy and privacy, many merchants are now exploring server-side GTM. This approach can elevate data quality and help with compliance. Learn more about the benefits and setup with this Server-side Tagging for Shopify (2026) video guide.
Using GTM for Marketing Automation and Personalization
To maximize marketing ROI, google tag manager in shopify is your launchpad for automation and personalization. Use GTM to deploy remarketing tags, A/B testing tools, and personalization scripts—all without editing your Shopify theme code.
Popular tools to integrate via GTM:
- Google Ads remarketing and conversion tags
- Facebook Pixel for retargeting
- Google Optimize for A/B testing and personalization
- Hotjar for user behavior analytics
By managing these scripts centrally, you gain the agility to launch new campaigns or experiments quickly. GTM also makes it easier to pause, update, or remove tags as your strategy evolves, keeping your store fast and compliant with privacy standards.
Privacy, Consent, and Compliance in Shopify Tag Management
Staying compliant with privacy laws is essential when using google tag manager in shopify. As regulations evolve, store owners must prioritize user consent and data protection. This ensures transparent tracking while building customer trust.
Navigating GDPR, CCPA, and Global Privacy Laws
Privacy regulations like GDPR, CCPA, and new global standards in 2026 are reshaping how google tag manager in shopify can be used. These laws require explicit consent from visitors before activating analytics or marketing tags.
Shopify merchants must understand which data is collected, how it is processed, and when user consent is mandatory. GTM plays a central role here, acting as the gatekeeper for all third-party scripts.
Key compliance challenges include:
- Adapting to restrictions on third-party cookies.
- Handling country-specific requirements for data processing.
- Maintaining documentation of consent decisions.
Ignoring these rules can result in fines and loss of customer trust. Prioritizing privacy is not optional—it is a core business requirement for anyone using google tag manager in shopify.
Implementing Consent Management Platforms (CMP) with GTM
To ensure google tag manager in shopify only fires tags after consent, a Consent Management Platform (CMP) is essential. CMPs collect, store, and relay user preferences directly to GTM, controlling which tags activate.
A typical setup involves:
- Integrating a CMP with your Shopify store.
- Passing consent state to the GTM dataLayer.
- Configuring triggers to respect user choices.
For a practical walkthrough, refer to Implementing Consent Mode v2 on Shopify, which outlines how to set up Google Consent Mode with GTM for Shopify in line with the latest regulations.
This approach keeps tracking compliant and transparent, making it easier to manage consent for all tags deployed via google tag manager in shopify.
Shopify’s Built-in Privacy Controls and GTM
Shopify provides a customer privacy API that works seamlessly with google tag manager in shopify. This API lets your store detect consent states and ensure tags only fire when allowed.
To connect GTM with Shopify’s privacy controls:
- Use the API to check consent before firing tags.
- Adjust GTM triggers to listen for consent events.
- For EU visitors, only load marketing tags after explicit approval.
Example code for a custom trigger in GTM:
if (window.Shopify && window.Shopify.customerPrivacy) {
  window.Shopify.customerPrivacy.on('consent', function(consent) {
    if (consent.marketing === true) {
      dataLayer.push({'event': 'marketing_consent_granted'});
    }
  });
}
This setup ensures that every tag managed by google tag manager in shopify respects user privacy choices.
Best Practices for Data Security and Tag Governance
Effective governance is critical for secure use of google tag manager in shopify. Regularly audit your GTM container to identify outdated or unauthorized tags.
Follow these best practices:
- Limit GTM access to trusted team members.
- Use version control to track tag changes.
- Set up approval workflows for publishing tags.
- Schedule periodic audits to review compliance.
By adopting these habits, you protect customer data and maintain a strong privacy posture for your store. These steps are essential for anyone relying on google tag manager in shopify to support data-driven growth.
Troubleshooting and Future-Proofing GTM in Shopify
Getting the most from google tag manager in shopify means knowing how to troubleshoot issues quickly and prepare for the future of analytics. Let’s break down the most common challenges, how to stay current, and what steps you can take to make your tracking setup future-proof.
Common GTM Issues in Shopify and How to Solve Them
Many merchants face problems with google tag manager in shopify, especially when tags do not fire on the checkout or thank you pages. This often happens if the GTM snippets are misplaced in the theme files or not added to the Additional Scripts area for order confirmation.
To resolve this:
- Double-check GTM snippet placement in both theme.liquid and Additional Scripts.
- Use GTM Preview mode to ensure tags load on every page.
- Verify with Google Tag Assistant or the browser console.
Another frequent issue is the dataLayer not being available during critical events. Debugging using Shopify’s Customer Events system can help, and the Shopify Community provides real-world solutions for verifying events through the console.
Keeping Up with Shopify and GTM Updates
Shopify’s platform evolves rapidly, and google tag manager in shopify must adapt. Changes in checkout architecture or theme updates can disrupt GTM functionality. Stay proactive by monitoring Shopify’s changelog and reviewing GTM release notes for new features like server-side tagging or enhanced privacy settings.
When new tag types or privacy features launch, test them in a staging environment before rolling out live. Regularly audit your GTM setup to remove outdated tags and ensure compatibility. This approach keeps your analytics reliable and reduces the risk of data loss during platform changes.
Preparing for the Future of Analytics in Shopify (2026 and Beyond)
The landscape for google tag manager in shopify will keep shifting as privacy regulations tighten and first-party data strategies become standard. Trends such as server-side GTM, AI-powered analytics, and multi-channel attribution are gaining momentum.
To future-proof your store, invest in server-side tagging, review your data collection practices, and stay informed through trusted resources. For a deeper dive into what’s coming next and how to stay ahead, check out Mastering strategies for 2026. By staying agile and informed, you’ll ensure your Shopify analytics remain accurate and compliant.
Resources, Tools, and Expert Recommendations
Unlocking the power of google tag manager in shopify requires not just setup, but the right resources and ongoing support. Mastering these essentials gives your store a measurable edge in analytics and marketing.
Essential Tools for Tag Management Success
To get the most from google tag manager in shopify, leverage a toolkit designed for precision and speed. Start with Google Tag Assistant to verify your tags are firing correctly. The GTM Debug Console allows you to simulate events and ensure all triggers and variables work as intended.
Shopify’s analytics dashboard is invaluable for cross-verifying data accuracy. For Chrome users, extensions like Tag Assistant Legacy and Data Layer Inspector+ streamline troubleshooting. Integrating marketing automation, such as in How to do a HubSpot integration, can further enhance your GTM setup by connecting your store with CRM and campaign tracking.
A combination of these resources empowers you to maintain clean, reliable data and quickly resolve issues.
Community and Official Support Channels
When working with google tag manager in shopify, tapping into the right support networks makes a dramatic difference. The Shopify Community forums are active with merchants and experts sharing solutions to common GTM challenges.
Official documentation from both Google Tag Manager and Shopify offers authoritative, up-to-date guidance. For visual learners, MeasureSchool’s YouTube tutorials break down complex tracking scenarios step by step. Engaging with these communities accelerates troubleshooting and exposes you to innovative tracking strategies.
Never hesitate to post questions or search for threads specific to your theme or integration, as many real-world issues have already been solved there.
Recommended Further Reading and Tutorials
Continual learning is vital to keep your google tag manager in shopify implementation ahead of the curve. Dive into MeasureSchool’s blog and video guides to stay current on best practices and new features.
Google’s own documentation provides deep technical insights and real-world use cases. For stores investing in multi-channel marketing, A comprehensive guide to LinkedIn marketing solutions demonstrates how GTM can track and optimize campaigns across platforms.
Bookmark these resources for ongoing reference as your analytics strategy evolves.
Expert Tips for Shopify Tag Management in 2026
To future-proof google tag manager in shopify, review your tracking needs regularly as your store and the digital landscape change. Collaborate with developers for advanced event tracking or custom data layers.
Implement strict version control and user permissions in GTM to prevent accidental changes. Schedule quarterly audits of your GTM container to retire outdated tags and maintain compliance.
Stay proactive by monitoring updates in Shopify’s changelog and Google Tag Manager release notes—being informed is your best defense against disruptions.