In 2026, a single misstep in your tag management can disrupt analytics, break marketing campaigns, and even risk compliance fines. If you want to avoid lost conversions or misleading data, you must regularly check tag manager configurations for accuracy and reliability.
This guide walks you through a proven process to check tag manager setups step by step, ensuring top performance, data integrity, and full compliance. You will discover the essential verification actions, recommended tools, troubleshooting techniques, and industry best practices that keep your tag management robust.
Protect your data, streamline your tracking, and follow each step for total confidence in your digital analytics.
Understanding Tag Manager Fundamentals in 2026
Tag management has evolved rapidly, becoming a cornerstone for digital analytics and marketing teams aiming to check tag manager setups for reliability and compliance. Grasping the fundamentals is crucial if you want to avoid costly mistakes and keep your data accurate, actionable, and privacy-compliant.
Evolution of Tag Management Systems
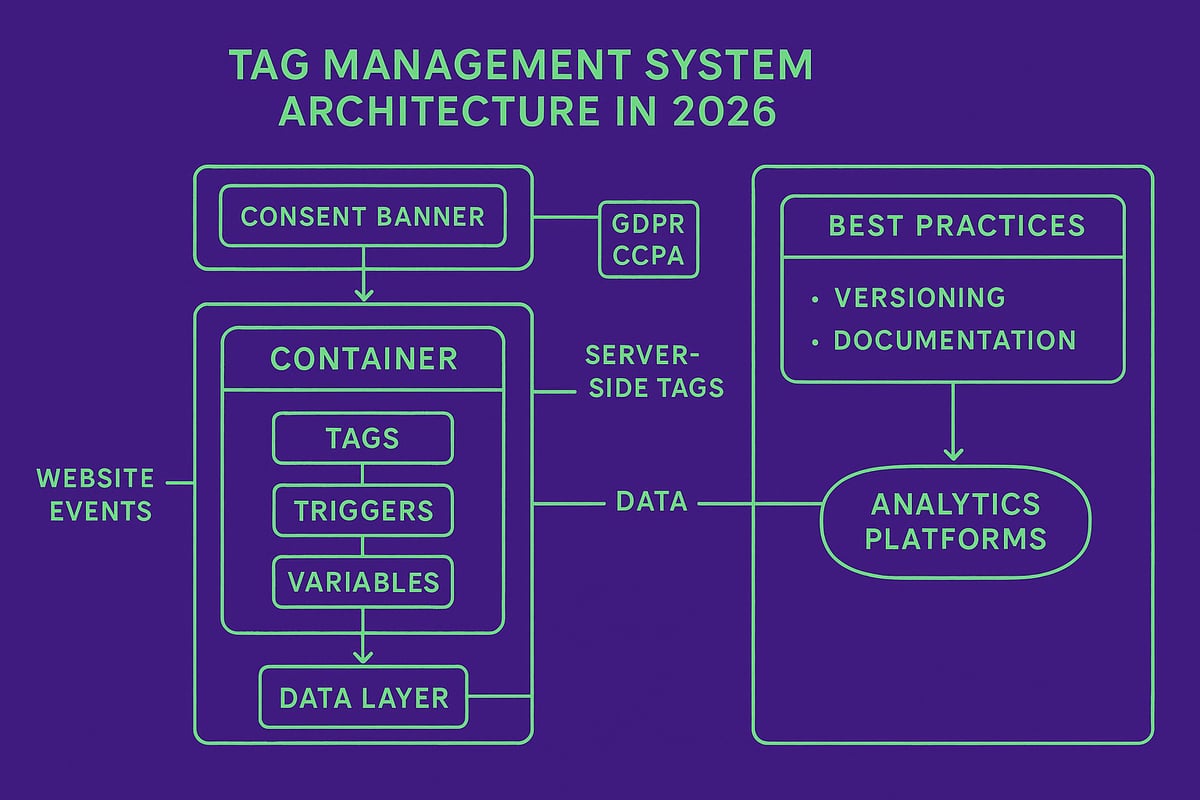
Tag management systems have come a long way since their early days of simple pixel deployment. Initially, teams added scripts directly to site code, risking slowdowns and errors. By the early 2020s, container-based solutions like Google Tag Manager (GTM) had become standard, enabling centralized control over all tracking scripts.
The landscape shifted again as privacy regulations such as GDPR, CCPA, and ePrivacy grew stricter. Modern systems must now check tag manager installations for compliance, including consent management for every user. Server-side tagging has surged, offering enhanced data security and flexibility. For instance, the rise of server-side GTM in 2026 allows businesses to route data through secure servers, reducing exposure to browser restrictions and data leaks.
Keeping up with these advancements is essential. The right setup helps you future-proof your data collection and stay ahead of regulatory changes.
Core Components and Terminology
To effectively check tag manager configurations, you must understand key components:
- Containers: The framework that holds all tags for a site.
- Tags: Snippets of code that collect or send data to analytics and marketing tools.
- Triggers: Rules that determine when tags fire.
- Variables: Dynamic values used by tags and triggers.
- Data layer: A structured repository for site data, enabling reliable tag firing and event tracking.
Data layers are especially vital, ensuring structured data flows seamlessly between your site and analytics platforms. Poorly configured triggers or missing variables can cause critical data loss. For example, if a trigger is set only for certain pages, conversions on others may go untracked, undermining your business intelligence.
Proper container versioning and thorough documentation are non-negotiable. Versioning lets you safely roll back changes if issues arise. Documentation ensures everyone on your team understands the current setup, reducing the risk of errors.
For a deeper dive into data layers and structured data, you can explore Everything on a prospect card, which breaks down these foundational elements for robust tag management.
Why Regular Tag Checks Matter
Routinely check tag manager setups to guard against data inaccuracy and business intelligence gaps. Even small missteps can lead to major consequences, like fragmented data silos or missed conversions.
Modern browsers, with features like Intelligent Tracking Prevention (ITP) and Enhanced Tracking Protection (ETP), can silently disrupt your tracking. If you fail to identify missing or broken tags, you risk losing critical insights. One real-world example: a retailer lost weeks of conversion data after a CMS update removed key tags from landing pages.
Recent studies show that over 60 percent of large websites report periodic tag drift or errors. This statistic underscores why ongoing checks are essential for compliance, accuracy, and overall marketing effectiveness.
Step 1: Verifying Tag Manager Installation
Accurate installation is the backbone when you check tag manager health. Even the most advanced stack can fail if the basics are overlooked. Let’s break down how to ensure your tag manager is installed correctly, from manual code checks to automated audits and best placement practices.
Manual Source Code Inspection
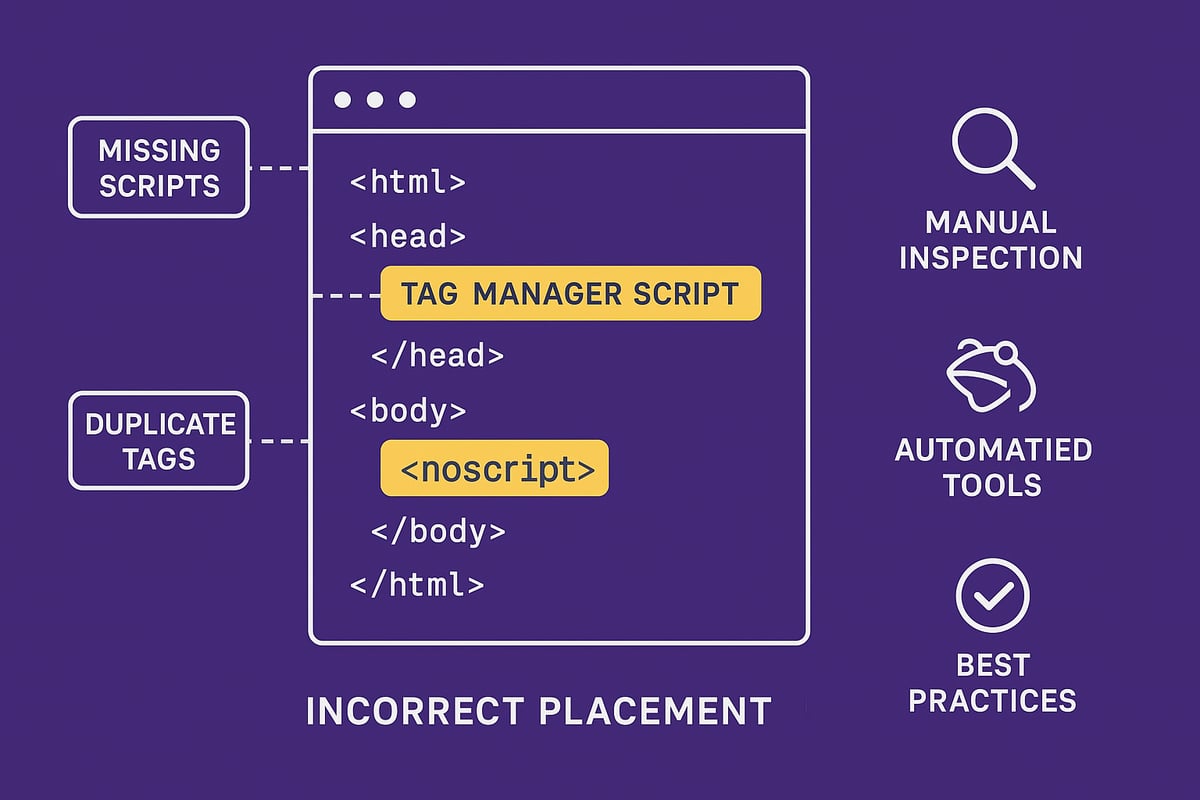
Start every check tag manager process with a direct look at your site’s code. Open your homepage, right-click, and select “View Page Source.” Use CTRL+F to search for gtm.js or your specific container ID. Confirm both the <script> and <noscript> tags are present immediately after the <head> and <body> tags.
Watch for common issues. Sometimes, copy-paste errors introduce smart quotes or break the script, causing the tag manager to fail. Modified or missing containers on select pages are a frequent culprit. For example, a marketing team might update a landing page template and forget to add the tag manager, causing tracking gaps.
Always check tag manager snippets for accidental changes, especially after CMS updates. Keeping a reference copy of the correct code helps you spot discrepancies fast. Remember, a single misplaced character can break your entire data flow.
Automated Site-Wide Tag Checks
Manual checks are critical, but they don’t scale for larger sites. To check tag manager presence everywhere, use tools like Screaming Frog. Set up a crawl and configure a custom search to flag pages that do not contain your gtm.js snippet. The tool will generate a list of untracked pages, making it easier to spot inconsistencies.
Review the results closely. Many enterprise websites discover that about 25 percent of their pages have inconsistent tag placement, often due to CMS template issues. For instance, missing tags on high-traffic landing pages can lead to lost conversions and incomplete analytics.
Automated tools help you check tag manager installation efficiently and regularly. Schedule site-wide audits after major site changes or deployments to catch new pages without proper tracking. This approach saves time and reduces manual error.
Ensuring Compliance with Tag Placement Best Practices
Proper placement is essential when you check tag manager reliability. Always insert the script tag immediately after the opening <head> tag and the <noscript> tag right after <body>. Avoid placing tags elsewhere, as it can delay firing or miss user interactions.
Never allow duplicate tag manager instances. Duplicate tags can cause multiple data hits, skew analytics, and lead to compliance issues. For example, if your analytics platform receives duplicate events, conversion metrics become unreliable.
For further details on efficient tag usage and performance, consult tag management best practices. Following these standards reduces data discrepancies and ensures your setup is robust.
Step 2: Using Preview and Debug Modes
Preview and debug modes are essential tools when you check tag manager configurations in 2026. They let you see exactly how tags behave in real time, helping you spot errors before they affect your analytics. Mastering these features ensures your data is accurate, compliant, and actionable.
Activating Preview and Debug Tools
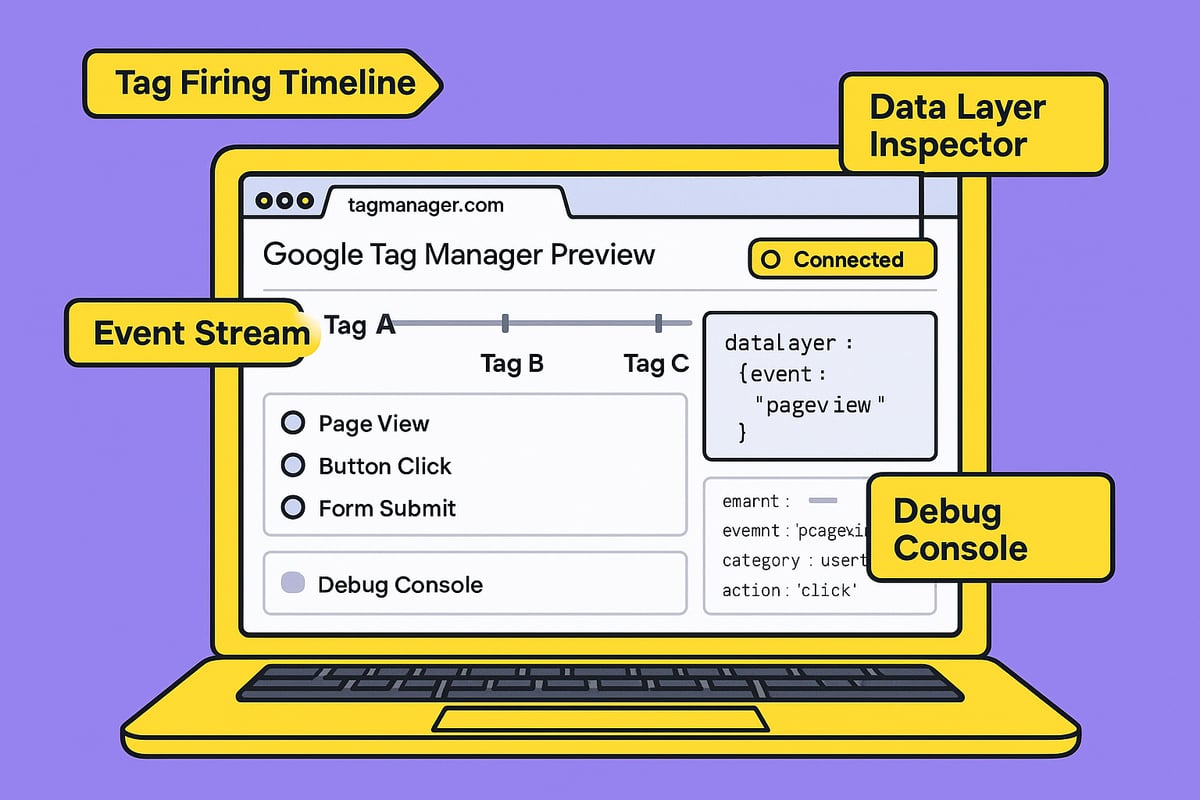
Start your check tag manager process by enabling Preview and Debug mode in your chosen tag manager. In Google Tag Manager, click the "Preview" button, enter your website URL, and connect. A successful connection displays "Connected" in the debug interface, confirming communication with your site.
Once active, the debug console appears at the bottom of your site in a new browser tab. Here, you can monitor fired tags, inspect data layer pushes, and see which triggers activate on each page event. These steps are crucial for GDPR-compliant tracking and are considered a Google Tag Manager best practices 2025.
If you use other platforms, follow their specific steps, but always confirm the preview tool accurately mirrors your live environment.
Troubleshooting Common Preview Mode Issues
Occasionally, preview mode may fail to connect or show events, disrupting your check tag manager workflow. Common causes include browser extensions, ad blockers, and cookie consent banners that block tag scripts or cookies.
To resolve this:
- Disable ad blockers and privacy extensions.
- Clear your browser cache and cookies.
- Temporarily turn off conflicting plugins.
- Ensure your consent banner allows essential analytics.
For example, if Preview mode does not display events, try accessing your site in incognito mode with all extensions disabled. This often restores normal functionality, letting you proceed with your tag audit.
Validating Tag Firing and Trigger Logic
As you interact with your site in Preview mode, watch how tags fire in real time. This step is vital when you check tag manager accuracy. The debug console lists each event, showing which tags trigger on clicks, pageviews, or form submissions.
For instance, if a tag fails to fire during a form submission, inspect the associated trigger. It may reference the wrong event or variable. Adjust the trigger logic, then retest in Preview mode until the tag fires as intended.
Use the following checklist to validate tag firing:
- Confirm tags fire only on the correct events.
- Check that no tags fire unintentionally.
- Verify data sent to analytics platforms matches expectations.
Documenting and Sharing Debug Results
After you check tag manager setups in Preview mode, document your findings. Most platforms offer options to export debug logs or screenshots of tag firing sequences. Share this documentation with your team or developers to streamline troubleshooting and maintain data integrity.
Keeping an audit trail is essential for compliance. Record what was tested, what passed, and any issues found. This habit improves accountability and speeds up future reviews, ensuring your tag management system remains robust.
Step 3: Deep Dive with Browser Developer Tools
Modern digital analytics demand precision. To truly check tag manager setups in 2026, browser developer tools have become indispensable. These built-in features allow you to see exactly how tags load, fire, and interact with your website, revealing issues that can otherwise go undetected.
Inspecting Network Requests
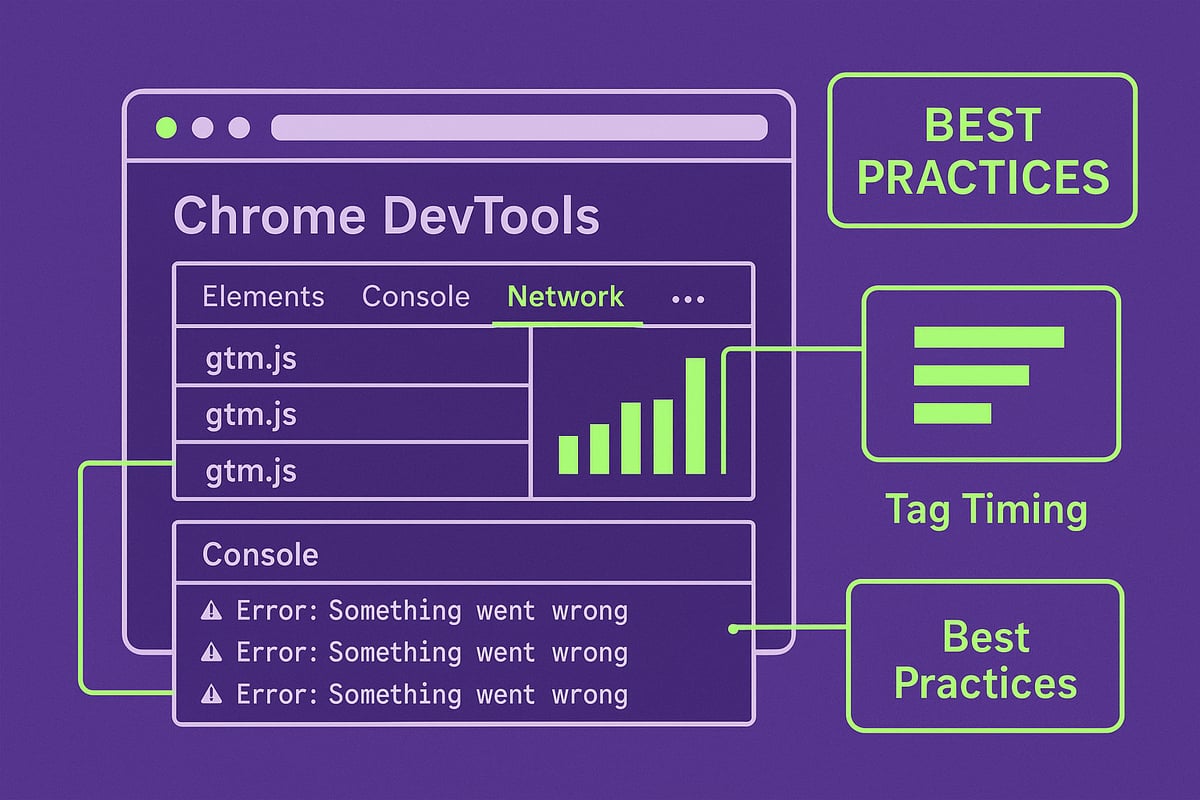
Start your check tag manager process by opening Chrome DevTools (or your browser’s equivalent). Navigate to the Network tab, then reload your page. Use the filter box to search for gtm.js or any relevant tag script.
A successful load returns a 200 OK status. If you see a 404 Not Found, the tag manager snippet might be missing or misconfigured. Watch for other status codes, like 403 (Forbidden) or 500 (Server Error), as they indicate deeper issues.
| Status Code | Meaning | Action Required |
|---|---|---|
| 200 | OK | Tag loaded properly |
| 404 | Not Found | Check tag manager snippet/link |
| 403 | Forbidden | Review permissions |
| 500 | Server Error | Server-side troubleshooting |
Checking these responses ensures your tag manager is present and functional across all pages.
Identifying JavaScript and Loading Errors
Next, move to the Console tab to continue your check tag manager routine. Look for red or yellow warnings. Common issues include:
- Blocked scripts due to Content Security Policy (CSP)
- Mixed content warnings (HTTP/HTTPS conflicts)
- Syntax errors in custom JavaScript
For example, a missing semicolon or a typo in a custom HTML tag can stop all subsequent tags from firing. Quickly addressing these errors preserves data integrity and analytics accuracy.
If you spot errors, copy the message and share it with your development team for rapid resolution. Never ignore console errors—they are a direct signal your tag setup needs attention.
Analyzing Tag Execution Timing and Conflicts
Timing is everything when you check tag manager performance. In the Network panel, observe when each tag script loads relative to other resources. If your tag manager loads after heavy third-party scripts, firing can be delayed or blocked.
Watch for race conditions, where two scripts compete to modify the same data layer variable. These conflicts can result in missing or duplicate analytics hits.
Example: If a marketing tag fires before your data layer is populated, conversions may not be tracked. Using tools highlighted in the GTM updates 2026 checklist, you can stay current on best practices to minimize these issues.
Best Practices for Browser-Based Tag Validation
To finish your check tag manager process, always:
- Refresh pages after updates to clear cached scripts
- Use incognito mode to avoid browser extensions interfering
- Capture screenshots and export logs for documentation
Disable caching in DevTools to ensure you’re seeing the latest code. This disciplined approach helps teams identify subtle tag issues before they impact reporting. Keep these best practices in your workflow for reliable and compliant tag management.
Step 4: Site-Wide Auditing and Ongoing Maintenance
Routine audits are crucial to ensure your check tag manager process remains airtight as your website evolves. Even the most robust tag setups can drift, break, or become outdated without vigilant monitoring. Proactive site-wide auditing and structured maintenance protect your analytics, compliance, and marketing investments.
Leveraging Crawlers and Automation Tools
To efficiently check tag manager coverage across your site, leverage crawlers like Screaming Frog or Sitebulb. Set up automated audits to scan all pages for tag manager code, flagging any that lack proper implementation. Custom search conditions, such as “does not contain gtm.js,” help pinpoint gaps quickly.
Automation lets you schedule recurring audits, so you never miss new pages or template changes. For a deeper dive into maximizing auditing efficiency, explore Maximizing efficiency: tools and technologies for actionable strategies.
- Run monthly or quarterly crawls.
- Export crawl results for easy review.
- Alert your team when missing tags are detected.
Consistent use of these tools ensures your check tag manager process scales with your website.
Monitoring Tag Health and Data Quality
Ongoing monitoring is essential to maintain data integrity. Tag monitoring platforms like ObservePoint or Tag Inspector automatically test if key tags and triggers are firing as expected. Set up alerts for anomalies, such as sudden drops in event counts or conversion data.
Automated tests can validate critical user journeys, ensuring no tracking gaps emerge. Cross-check analytics data sources regularly to spot discrepancies early. If you notice mismatches, prioritize a check tag manager audit to locate the root cause.
- Schedule automated tag tests for high-traffic pages.
- Use dashboards to visualize tag health.
- Investigate any unexpected data changes promptly.
A strong monitoring routine helps you catch issues before they impact business decisions.
Handling CMS and Template Changes
Website updates often introduce new templates or sections, which can accidentally omit tag manager code. Collaborate closely with development teams to ensure every new template inherits the correct tags. Integrate a check tag manager item into your QA checklist before any launch.
- Review all new or revised pages for tag coverage.
- Document template changes and their impact on tracking.
- Test user flows on staging environments to verify tags fire.
Catching missed tracking before go-live prevents costly data loss. Make check tag manager validation a standard part of your deployment workflow.
Version Control and Change Management
Maintaining a centralized policy for tag changes is critical in 2026. Use your tag manager’s built-in versioning to log updates and roll back if issues arise. Document every change, whether it’s a new marketing pixel or a trigger adjustment, to keep your audit trail complete.
- Assign clear ownership for tag updates.
- Require approvals for significant changes.
- Store documentation in a shared repository.
A disciplined approach to change management keeps your check tag manager setup resilient and auditable, supporting compliance and long-term success.
Step 5: Advanced Tag Manager Checks for 2026
As we approach 2026, advanced strategies are vital when you check tag manager health and reliability. Beyond the basics, it is time to ensure seamless platform integrations, privacy compliance, and future-proof configurations. Let us break down the essential steps for advanced tag audits.
Integrating with Analytics and Marketing Platforms
A robust check tag manager process in 2026 starts with verifying integrations across all analytics and marketing tools. Ensure your tag manager is sending accurate data to platforms like Google Analytics 4, Meta Pixel, and HubSpot.
Use platform-specific debug tools, such as GA4 DebugView, to confirm event and conversion data. For organizations leveraging HubSpot, follow best practices outlined in the How to do a HubSpot integration guide to validate that data flows correctly between your site and HubSpot.
When you check tag manager setups, always validate that every critical event is tracked and attributed properly. This reduces the risk of data loss or misattribution.
Adapting to Privacy and Consent Requirements
Strict privacy laws and browser restrictions require you to check tag manager configurations for compliance. Tags must respect user choices, only firing after consent is granted.
Leverage consent mode and conditional tag firing to align with regulations like GDPR, CCPA, and new browser privacy features. Use your tag manager’s built-in consent tools to create logic that blocks or activates tags based on user input.
Test scenarios with and without consent to make sure your tracking adapts dynamically. This check tag manager step is critical for both data compliance and user trust.
Server-Side Tagging and Future-Proofing
Server-side tagging is now essential for data privacy and performance. When you check tag manager deployments, compare client-side and server-side data for consistency.
| Tagging Method | Data Control | Privacy | Performance |
|---|---|---|---|
| Client-Side | Low | Lower | Medium |
| Server-Side | High | Higher | High |
Review the Server-side tracking compliance 2026 report for the latest best practices and compliance mandates. Ensure your server-side container is collecting all necessary data and that triggers align with your privacy policy.
A check tag manager audit should include troubleshooting server-side tag errors using network logs and validation tools.
Preparing for Emerging Technologies and Standards
Browsers continue to evolve, introducing new tracking prevention measures and standards. To check tag manager readiness, monitor industry updates like ITP, ETP, and Privacy Sandbox.
Adapt your tag configurations promptly when new restrictions roll out. Stay compliant with evolving data laws by subscribing to official updates and participating in community forums.
Document every change and regularly review your tag manager setup to ensure ongoing compatibility. This final check tag manager step keeps your analytics and marketing efforts resilient against future shifts.
Troubleshooting and Best Practices for Reliable Tag Management
Accurate tag management requires more than setup. It demands a sharp eye for troubleshooting and a commitment to best practices. If you want to check tag manager reliability, follow these proven strategies to ensure your data remains trustworthy and actionable.
Common Tag Manager Issues and Fixes
When you check tag manager setups, missing or duplicate tags, firing errors, and data discrepancies are top culprits. Start by scanning for duplicate containers, which can lead to inflated analytics.
- Review triggers and variables for accuracy.
- Use debug tools to watch tag firing in real time.
- Map variables correctly to avoid data loss.
If a tag fails to fire, revisit your trigger logic and variable mapping. For campaign tracking, see How to activate a campaign to verify correct tag activation steps. Always document each fix for future reference.
Documentation and Team Collaboration
A reliable check tag manager process relies on clear, up-to-date documentation. Record every tag, trigger, and variable, including the purpose and version.
- Use shared documents or wikis.
- List all tags, with creation and edit dates.
- Provide step-by-step guides for updates.
This approach streamlines onboarding and allows teams to troubleshoot faster. Assign responsibilities so everyone knows who manages which part of your tag manager.
Security and Performance Considerations
Security is paramount when you check tag manager implementations. Restrict access to trusted users and review permissions regularly.
- Minimize third-party scripts to reduce bloat.
- Audit for unnecessary tags or plugins.
- Monitor for unauthorized code changes.
By keeping your tag manager lean, you boost site performance and reduce risk. Always avoid exposing sensitive data through tags.
Ongoing Education and Industry Monitoring
To stay ahead, make ongoing learning part of your check tag manager routine. Track updates from tag manager providers, join forums, and attend webinars.
- Follow industry blogs for new features.
- Pursue certifications to deepen expertise.
- Share insights with your team regularly.
Keeping skills sharp helps you adapt to changes, like new privacy rules or server-side tagging advancements.
Checklist for Routine Tag Manager Health Checks
Establish a recurring checklist to check tag manager health. Schedule monthly and quarterly audits to catch issues early.
Sample checklist:
| Task | Frequency |
|---|---|
| Review tag firing and triggers | Monthly |
| Audit for duplicate/missing tags | Monthly |
| Update documentation | Quarterly |
| Test new templates for tag coverage | Before Launch |
| Verify access permissions | Quarterly |
Consistent checks ensure your tag manager remains robust and compliant.